|
|
CourseBuilder Support www.coursebuilder.auckland.ac.nz |
|
|
")
|

Decision tree
The Decision Tree allows the creation of interactive flow charts representing decision pathways so that any branching decision process can be modelled. Students can interact with it and receive feedback on correct or incorrect pathways. The tool can incorporate audio, video and images at each decision node to enhance the learner's experience.
An example Decision Tree has been developed by the Paediatrics Department which simulates a real-life clinical scenario in which the learner acts as a health care professional obtaining a history and physical examination and making diagnostic and therapeutic decisions: http://flexiblelearning.auckland.ac.nz/evpaeds_example/1_5.html
| TIP: Decision trees require careful planning. We advise you to create the branching pathways on paper first, or seek assistance from the elearning staff at CLeaR: email coursebuilder@auckland.ac.nz |
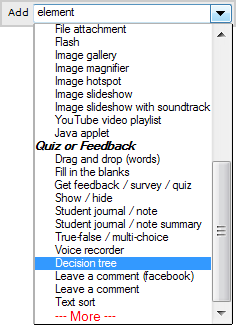
Add a Decision tree
Select Decision tree via the element selection list. If you don't have this option, see Customise your elements list
Options
Add the Height and Width of the 'viewport' that surrounds the Decision tree. The default for new Decision trees is 820px high and 100% wide.
Note: If you alter the height and width of the Decision tree 'canvas', you may also need to alter the height and width of the viewport.

Start editing the Decision tree by clicking the ![]() button.
button.
The resulting toolbar gives you all the options for creating and editing nodes. Note that these options are relevant to whichever node is currently selected.
Contextualised Help is also available.


