
|
|
")
|

Teach students in multiple locations
 Do you need to deal with students and staff who are spread around many different locations and/or are possibly only available at different times?
This section will introduce you to some of the tools available to support ‘distributed learning', making use of a variety of formats and mediums including print, digital (online) and face-to-face:
- Use the Learning Management System to provide a centralized online environment
- Create a course website to guide learning activities and provide access to resources
- Use tools for synchronous activity when necessary
![]()
Quick checks and tips re teaching in multiple locations [view/annotate inline]
Examples
A rich, connected, fully online post-graduate course
The E-Learning & Clinical Education course (ClinEd 711) is a postgraduate course about elearning in the clinical setting first launched in 2007. Participants enrol from all over New Zealand and recently also Australia and the UK. All are clinical educators, typically with very busy professional and personal lives, so it was considered essential that the course be offered in a flexible, fully online format.
Using a range of available technologies, LTU staff (Senior Tutors, Adam Blake and Pauline Cooper-Ioelu, and Director, Dr John Egan) have developed the course into a rich, highly engaging and collaborative experience. Although the students do not meet face-to-face with each other or the teaching staff, they have several channels of communication open to them and over the duration of the course become very connected with each other; talking, debating, sharing the teaching role, and collaborating on relevant, authentic tasks.
The technologies used to enable this to happen:
The learning management system: students start the course by logging in to Canvas. From there they gain access to all course materials (created using the CourseBuilder course authoring tool) and use:
|
|
Collaborative tools:
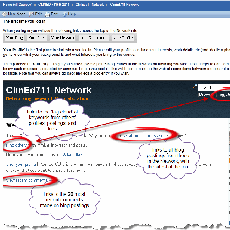
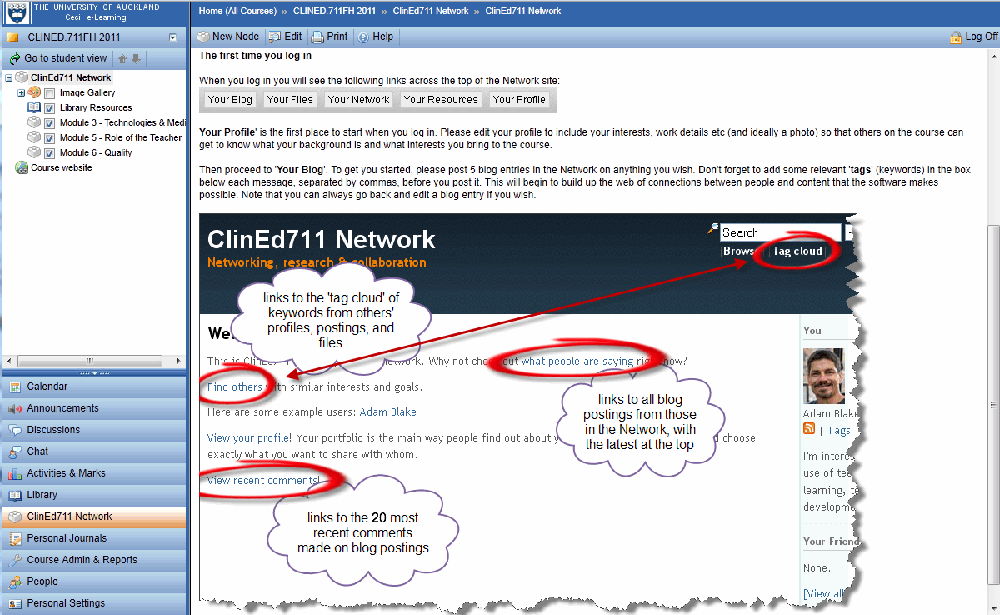
Course social network (powered by Elgg and with the support of CLeaR): early in the course, online discussion and resource sharing moves away from the more rigid discussion forum to this social networking environment which enables a free flow of communication and exchange of ideas and resources.
Social bookmarking - tagging of individual interests, posts and files enable the students to see shared connections across people and topics.
CourseBuilder : students increasingly use CourseBuilder in conjunction with the course social network to collaboratively develop and facilitate their own online ‘student-led' modules, one of the requirements of the course.
Wikis - students can also opt to use PBworks or Wikispaces to work in pairs or groups to develop and facilitate their student-led module.
Real-time (synchronous) communication
Students phone from time to time with individual queries, but the objective of maximising flexibility means that there is no synchronous communication built into the course. Students also send individual emails, but not an unmanageable flood, as they are encouraged to openly share questions and ideas as the best way to build knowledge .
Teaching undegraduate medical students in seven locations |
|
|
The Bachelor of Medicine Programme with over 300 students is taught in ‘cohort groups' in several locations around the North Island. So Helen Roberts who co-ordinates the 5th year students on the Obstetrics and Gynaecology attachment, has adapted the run to be suitable for distance teaching and learning. Students previously attended campus-based lectures at the beginning of each attachment. Helen has reviewed those lectures and using CourseBuilder, has created web based teaching bites, which are accessible to students from anywhere, at anytime. Importantly, this means the materials are also available to the teaching staff at each site so it provides them with shared guidelines and standards for the attachment. Class discussion takes place on the discussion boards in the LMS where students are asked to respond to ‘opinion pieces' and select from questions which guide contributions and the exchange of comments. The discussion boards are divided into groups based on location, but all students can read all boards and frequently do as the discussion becomes valuable student-contributed content. Students also have to participate in weekly tutorials where they present casework orally via video-conferencing. Staff in each centre share the facilitation as they take on the tutoring role for the students in their cohort group. These sessions are highly interactive with lots of questions and feedback both from whoever is logged in to the session. Helen admits there were numerous technical issues to start with but these have been resolved over time and she feels the sessions are now working smoothly. She says what is needed is a dedicated staff member who co-ordinates the sessions and someone to set up the equipment early and test links before the session begins. Teaching staff in each centre do need to be trained to use equipment and also need guidance about facilitation of online discussion. Staff from all the centres have an annual teaching meeting to run through any problems and make improvements. Helen also has 1-1 sessions to familiarise staff with the LMS and she stays in touch with frequent phone calls as issues arise. She says things go most smoothly when there is two designated staff at each cohort site so there is sharing and support for the teaching role. |
|
Canvas
What is a learning management system or LMS?
A learning management system (LMS) is a software application for the administration, documentation, tracking, reporting and delivery of electronic resources and courses.
What is Canvas?
Canvas is the University of Auckland's Learning Management System and from 2016 all taught courses (PG and UG) in the Faculty of Medical and Health Sciences will be managed through (LMS) Canvas. It replaces the previous system, Cecil.
Canvas is a cloud-based system so its tools can be used online, on mobile devices and tablets.
How can I use Canvas in my teaching?
Canvas can be used to give your students access to course materials online, for connecting your students to each other, to track their use of those materials, for assessing by quizzes and tests and grading. It can be used for face-to-face, blended or distance teaching and learning.
The list below are some of the most basic features of Canvas:
- Announcements
- Assignments (formal and informal tasks)
- Rubrics
- Marks and grades
- Modular content
- Discussions
- Customisable web pages
- File storage
- Class lists and participants
- Quizzes
- Calendar
- Real time conferencing/virtual classroom (Also called “The Big Blue Button”)
- Collaborations and group project work
You will be able to use a variety of tools and applications that integrate seamlessly with Canvas such as Turnitin, Coursebuilder and Piazza.
How do I get started?
To get started you'll need to arrange for access to courses you are involved with then login to Canvas, and work on the courses to which you have access.
What support is available to me?
For FMHS staff our direct contact for Canvas support is Sophie An s.an@auckland.ac.nz
But Canvas offers its own online guides which are generally the best place to start:
Canvas Guides – search the 'official' Canvas guides for any information you need.
Canvas Community – ask the global community of Canvas users a question.
For information about the implementation of Canvas at the University see - Canvas at the University of Auckland
There is also 24-hour support for Canvas
Online live chat – select ‘Chat with Canvas Support’ from the Help menu in Canvas
Canvas Support Hotline – call 0800 001469 from a landline or mobile to speak with a Canvas Support representative
What is CourseBuilder?
CourseBuilder software enables you to create rich online resources that can be accessed by students anywhere, anytime - without you having to know anything about HTML.
Resources created in CourseBuilder can either 'stand alone' (with selected access options) or can be embedded in Canvas, enriching your use of that space.
What can I do with CourseBuilder?
- structure sequenced, online learning resources
- compose and import text
- insert media (images, videos, sound files, PowerPoint recordings)
- develop activities (e.g case studies, reflections and quizzes)
- monitor student responses and much more
- collaboratively author with another staff member
You can publish your website for students to view while you continue to edit and re-publish as needed.
How might I use CourseBuilder in my teaching?
One of the great things about CourseBuilder is that you can organize information in a variety of ways. This allows you to present learning resources to students in terms of learning sequences that progress students through the course topics in a logical manner.
CourseBuilder also allows you to use a variety of media to meet students' different learning styles. You can include galleries of expandable images, upload audio and video in context and create more complex learning interactions such as journaling with individualised feedback. There is a range of interactive elements that can be selected to easily create rich learning resources.
How do I get started?
Getting started with CourseBuilder is really easy.
- Go to the CourseBuilder login page and create an account if you don't already have one.
- Log in and take a look at the CourseBuilder support pages which provide clear explanations of how to use CourseBuilder.
- Use the CourseBuilder "sandbox" to try out the different functions of CourseBuilder before moving on to create your first course (this will appear in your course list as you login).
What support is available to me?
CourseBuilder is fully supported with online help that is very easy to follow.
The Learning Technology Unit offers one-one or small group sessions to familiarise you with Coursebuilder. Get in touch with us if you would like to find out more.
Web and Video Conferencing
Web and video conferencing are used to deliver presentations, lectures, seminars and workshops frequently in 'real time'. They can be very interactive allowing for text chat, video chat and "voting polls" allowing participants to respond to a presenter's questions.
How can I use web and video conferencing in my teaching?
- If your students are not able to get together, this can be a great way to build a sense of community, especially at the start of a course.
- If you have difficult concepts to teach, it is an opportunity to explain material and take questions during or after a presentation.
- You can upload documents such as PowerPoint files, use a whiteboard and screen sharing for viewing during a session.
- Conferences can be usually be recorded or archived for anyone who misses the live session.
- Students can give presentations to class or smaller groups.
What systems and support are available to me?
Click the links below for details.
BigBlueButton is the web conferencing system integrated with Canvas. BigBlueButton enables you to share documents (PDF and any office document),use webcams, chat with audio - from your desktop. It can also record sessions for later playback (note these are only archived for a limited period of time).
What support is available?
As this is a tool that is integrated in Canvas the direct contact for FMHS staff support is Sophie An s.an@auckland.ac.nz
You can also see this page in the Canvas Support Guides.
Previously the University used Scopia as the videoconferencing tool of choice. However, as of September 2015 Zoom, a cloud based system is now being used.
Zoom can be accessed by following the steps below:
- Access to login to the zoom website will now be through https://auckland.zoom.us
- When authenticating to the website you will now do so through the University's Single Sign-On. Please click on the “Sign in” button at the top right of the screen to login, alternatively you can use “Host a meeting” to create meetings, or “Join a Meeting”.
- If you want to go further, the download page allows you to download any plug-in’s you want to add (optional) - https://auckland.zoom.us/download.
For the next time you want to use Zoom, or if you have already installed it, you will need to make a small one-time configuration change. To do this:
- Open the Zoom client.
- Click on the “Sign In with SSO” button
- Enter the SSO site URL: https://auckland.zoom.us
- Click the “Continue” button to sign-in.
What support is available to me?
For more information about Zoom please visit the staff intranet:
If you have any detailed questions about Zoom, please refer to the University of Auckland Knowledge Base at the Staff Service Centre:
The University uses Google Apps and Google+ includes Hangouts, which enable group video calls and screen sharing for up to 15 participants. You can also record these and they become 'Hangouts on Air' for archiving and playback via Youtube.
Our Google Apps are accessed via our EC mail accounts: upi@aucklanduni.ac.nz (all staff and students have these).
The basic steps are:
- Your students join Google+
- You add your students to a course ‘Circle’ that you create in Google+ (you may need to get them to email you their G+ username so you know which ‘Joe Bloggs’ account to add of the 13 that may be listed in G+)
- When it’s time for the group call (you and up to 14 others) you log into Google+ and click on the ‘+’ next to New Hangout at the top right of the G+ screen
- You start typing the name of the course Circle you’ve created, and click to check the box next to it to choose to include its members in your video call (you can also click to add further Circles or individual contacts, up to 15 people in total)
- Once the Circle or contacts you want to include in the call have been added, click the video call icon immediately underneath to start the call
- All of those added to the video call are then notified of the incoming call on whichever devices they’ve chosen to add G+ to and are logged into Google on, and can accept the call invitation to join in.
What support is available?
This is the support page for newcomers to Hangouts.
Here is support for screen sharing.
Skype is a software application that allows users to make voice / video calls over the internet. Skype supports:
- Skype to Skype calls;
- Skype to landline calls (charge);
- Skype to mobile calls (charge);
- Video calling;
- Group video calling (premium charge);
- Screen sharing (premium charge).
You can get started with Skype by going to the Skype website and downloading the Skype application for your system e.g. Windows, Mac, iPhone, iPad, Android. Once you've installed Skype you'll be prompted to make a test call to ensure that Skype is working properly.
What support is available to me?
Full support is available on the Skype website.

