Ask a question
Scroll down to ask a question that isn't answered here.
 Access to CourseBuilder
Who can access CourseBuilder?
All staff at The University of Auckland have free access to CourseBuilder editor to create and collaborate on course resources. Course administrators can assign editing rights to others under the Course Preferences > Advanced tab. See:
- Allow a colleague to edit my course
- Allow a colleague, who is external to the University, to edit my course
- Allow students to edit a particular page or section
- Allow a reviewer to view your course before it's published
If you have a Research Assistant or a Course Coordinator who cannot create new courses, please create the course for them, then add them to the course as an administrator. This also goes for collaborating with users who are external to the University - they will need to sign up for an account then give you their 9-digit user id.
For information on which link you give out to your students, see CourseBuilder basics > Publish a course.
For information on restricting access to the published version of the course, see What levels of access are available for students?
How do students access my course?
Students will access the course using the URL of the published version. From the CourseBuilder editor:
- Published the course via the
 button.
 - View the published version by clicking

- Copy the URL in the address bar for the published version and give this to your students.
You can also add this URL to Canvas; see I want to embed my course within Canvas.
What levels of access are available for students?
When you publish a course you have four levels of student access. Choose the access level under Course Preferences > Advanced tab.
- All current staff and students (default)
- Students enrolled in the course plus CourseBuilder editors (click for more detail)
- Anyone with a University login
- Public access (no login required)
If you choose level 4 (public access) you will need to contact coursebuilder@auckland.ac.nz to request a public URL for the course.
My students are being denied access to the published site
Sometimes the student has been given access to the Canvas course, but not the CourseBuilder content. This can occur when the CourseBuilder author has selected course access ...
- level 2. (Students enrolled in the course plus CourseBuilder editors)
... from Course preferences > advanced tab. This level of access requires the author to type in the calendar course code. When students log in, CourseBuilder checks the student's username against the class list of enrolled students. If a student's enrolment status is still being processed, their username will have not yet been entered into the enrolment database (click for more detail).
To resolve this, you can either relax the course access restriction to ...
- level 1. (All current staff and students)
... or type the usernames of the affected students into the Page contributors / student authors / reviewers list within Course preferences > advanced tab.
I want to enable a colleague to edit my course
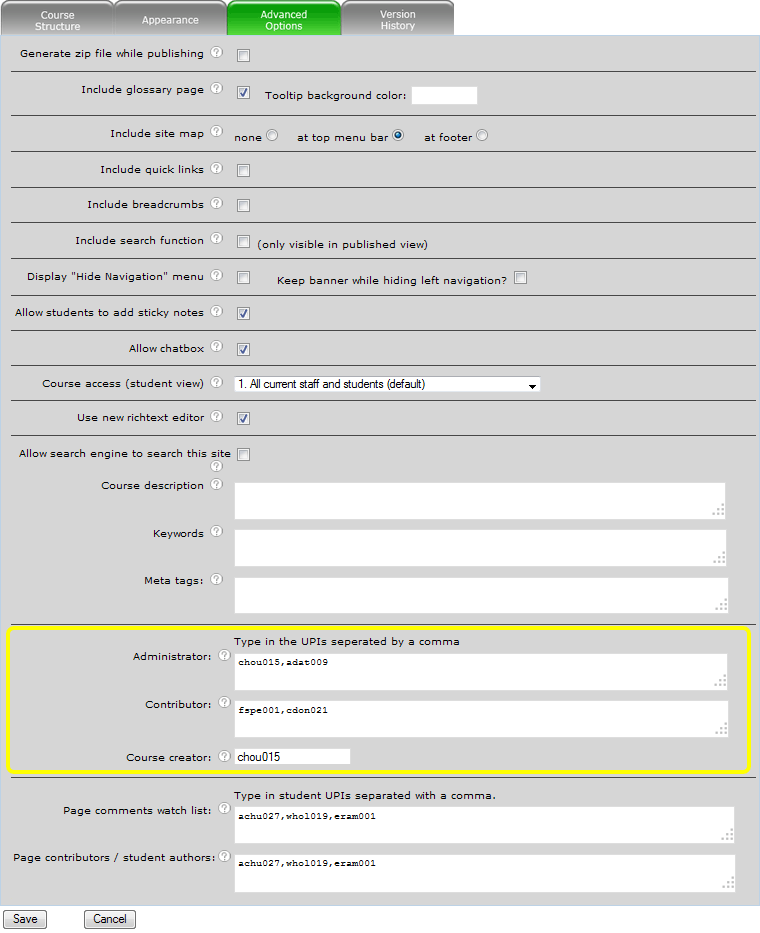
Within the CourseBuilder editor, click ![]() then click the Advanced Options tab. Add the username of your colleague into either the Administrators' list or the Contributor's list. The course will appear in your colleague's CourseBuilder Site List.
then click the Advanced Options tab. Add the username of your colleague into either the Administrators' list or the Contributor's list. The course will appear in your colleague's CourseBuilder Site List.
- Administrators can change every aspect of a course, including course preferences, add/move/edit/delete pages and page elements. They can also add or remove additional administrators.
Contributors can only edit page content, i.e. add, move, edit, or remove page elements. Contributors cannot publish the course, only Administrators can do this.
I want to enable a colleague, who is external to the University, to edit my course
If your colleague doesn't already have a University username and password, ask them to create an account. They will be issued a nine-digit username, ask them for this, then you can follow the steps to enable a colleague to edit my course.
I want a reviewer to view my course before I publish
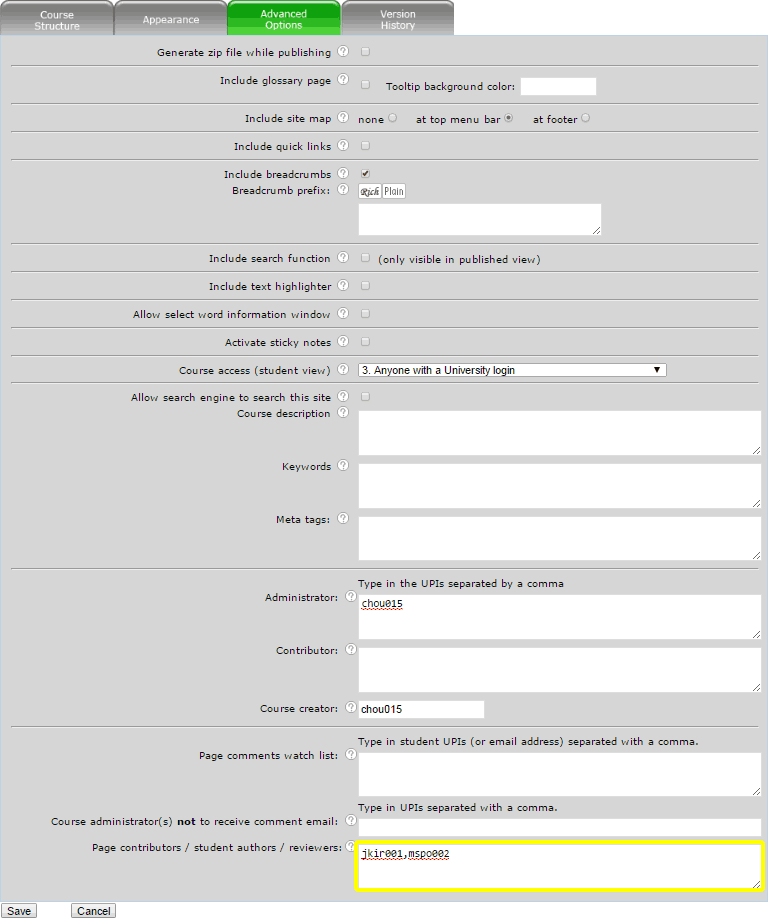
Within the CourseBuilder editor, click ![]() then click the Advanced Options tab. Add the username of your colleague into the Page contributors / student authors / reviewers list. The course will appear in your colleague's CourseBuilder Site List (comma-separate multiple reviewers). They will have read-only access to your course.
then click the Advanced Options tab. Add the username of your colleague into the Page contributors / student authors / reviewers list. The course will appear in your colleague's CourseBuilder Site List (comma-separate multiple reviewers). They will have read-only access to your course.
If your reviewer does not already have a login to CourseBuilder, ask them to sign up for a new account.
The New Course button is not visible to me
The "Add a new course" feature is active for staff at the university of Auckland. If you feel like you should have access to create courses, please ask your supervisor to create a course for you and assign you as an administrator. If you feel like you have been blocked from creating new courses in error, please email us with your username to coursebuilder@auckland.ac.nz.
I forgot my CourseBuilder password
CourseBuilder uses the University of Auckland's UniSign service, so your password will be the same as for most other UoA services. If you do not know your UniSign password, or you have difficulty logging in, you can reset your password. Click I forgot my password from the CourseBuilder login page and follow the instructions.

I was logged out unexpectedly
CourseBuilder is accessed through the University of Auckland's UniSign service. UniSign will log you out after 2 hours of inactivity (i.e. you are not actively navigating between CourseBuilder pages).
Sometimes you might be editing for longer than 2 hours, therefore we suggest you either:
copy your content to the clipboard before clicking Save,
or if it's practical:
edit your content in Word before copying and pasting it into CourseBuilder.
 Publishing / exporting your course
I don't seem to be able to publish my course
You may have been given Contributor access rather than Administrator access. If you feel that you should have publishing rights, please contact the CourseBuilder course administrator for the particular course. For more info, see access to CourseBuilder.
What URL do I give to my students?
Students will access the course using the URL of the published version. From the CourseBuilder editor:
- Published the course via the
 button.
 - View the published version by clicking

- Copy the URL in the address bar for the published version and give this to your students.
You can also add this URL to Canvas; see I want to embed my course within Canvas.
I've published my course but the students can't see the changes
Usually publishing is instant, however some CourseBuilder websites publish to another URL, in which case CourseBuilder will tell you how long it will take before the students see the changes when you click ![]()
Sometimes there is more than one copy of the course, e.g. 2013 and 2014 versions. If your students are accessing the course through Canvas, they may still be viewing the old version. Make sure that you save the URL to the latest version within Canvas. For details, see I want to embed my course within Canvas.
See also My changes are not being saved
 Using CourseBuilder with Canvas or Moodle
I want to embed my course within Canvas
CourseBuilder allows you to either link to a CourseBuilder site from the Canvas menu, embed the entire CourseBuilder website within a Canvas module(External URL), embed a single CourseBuilder page, or embed a single CourseBuilder page element, auto resized within the Canvas environment and avoid scrollbars for students.
Please visit the page: Embed your course within Canvas.
My students are being denied access to the CourseBuilder content
Please see the question: My students are being denied access to the published site
I want to export my course to a file that can be restored into a Moodle course shell
There are three approaches:
- In CourseBuilder, publish to an IMS content package zip file under Course preferences > Advanced Options > Generate zip file while publishing. When you publish, our system will generate the zip file to download from the CourseBuilder site list. Upload to Moodle using Add resource > IMS content package. This method is time consuming because it requires you to upload a new version of the course to Moodle whenever you make a change in CourseBuilder. Also, Moodle will impose a size limit on the zip file that you can upload. The default size is 16Mb, but your Moodle administrator may have increased this.
- In Moodle choose Add resource > URL, then paste the link to the published (student view) version of the course. This will simply add a text link to the CourseBuilder site.
- In Moodle, choose Add activity > External tool, then paste the link to the published (student view) version of the course. This will embed a viewport within Moodle that displays the CourseBuilder site.
Methods 2 and 3 are simple and less time consuming because any change to the CourseBuilder course will automatically be reflected in Moodle.
I want to suppress the banner and side navigation for my CourseBuilder course
If you are embedding your course within the frame of another LMS, you might consider suppressing your CourseBuilder banner and side navigation to allow more screen real estate.
- Click
 button and go to the Appearance tab.
 - Check the box called Suppress banner/navigation pane in published version.
- Click Save.
- Click
 to re-publish your course.
 Using links
I want to link to a particular tab within a Tabbed content or Accordion
Yes this is possible.
Link to a tab within a Tabbed content element:
- From the CourseBuilder editor, browse to the page that you want to link to.
- Click the tab within the Tabbed content.
- Copy the URL from the address bar (the URL should end with #2_2 or similar).
- Return to the page where you will paste the link and use the hyperlink tool in the Richtext editor.
Link to a particular accordion within the Accordion element from a different page:
- From the CourseBuilder editor, browse to the page that you want to link to.
- Return to the page where you will paste the link and use the hyperlink tool in the Richtext editor.
- Add #Thetitleoftheaccordionwithoutspacesorpunctuation to the end of the URL.
E.g. https://flexiblelearning.auckland.ac.nz/coursebuilder_support/4.html#WhocanaccessCourseBuilder
Link to a particular accordion within the Accordion element from the same page:
- Clcik the hyperlink tool within the Richtext editor. In the Link URL field type "javascript:void(0)".
- Click the Events tab. In the onclick field type "myHighlight('#thetitleoftheaccordionwithoutspacesorpunctuation').
- Click Insert.
- Click Save.
I pasted a wiki-style link. Now it doesn't work when I publish
If you are copying content from one page to another, and the content includes wiki-style links, you must copy the content from the Richtext editor, rather than the page itself. This will preserve the wiki-style syntax that creates the page link.
For more on wiki-style links see: Link between pages.
I want my wiki-style link to open in the same window
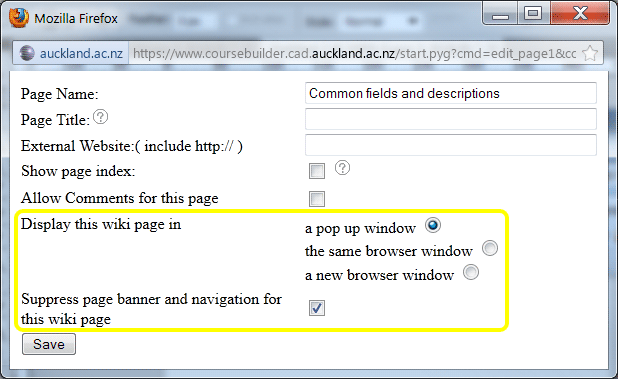
- From the page footer click Show wiki pages.
- Click the yellow
 pencil icon next to the wiki page name.
 - Choose how to open the wiki page from the available options:
 Using multimedia
I want to make a screen recording
We recommend using BB FlashBack for recording your screen (Mac users might try Jing or QuickTime 10). Export your recording as MPEG4 as this format has a good compression vs quality ratio.
For best results, record a region of your screen that is set to the width and height of the final video. Don't record the whole screen and scale the video because this will affect the clarity and file size. Also, make sure that BB FlashBack is recording in Graphics Device Interface (GDI) mode.
| Tip: If you can't fit everything into a small region of the screen, try reducing the application's zoom level. For example, if you are recording a web browser, press CTRL minus to zoom out. For a Microsoft Office application, use the zoom controls |
Using your video with CourseBuilder
Either: embed your recording using CourseBuilder's Audio/video element.
Or: add a link to the recording via the Richtext editor's Insert/edit audio or video tool ![]() .
.
For more on embedding video, see: CourseBuilder basics » Insert audio or video.
Even more
For a demonstration on recording with BB FlashBack, visit: http://www.bbsoftware.co.uk
I want to use a screen shot (snapshot)
For best results, resize the application's window first so that the region of the snapshot is set to approximately the width and height of the final image. Try not to take a snapshot of the whole screen and resize it because anti-aliasing will affect the clarity and file size.
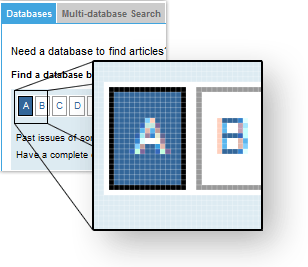 | 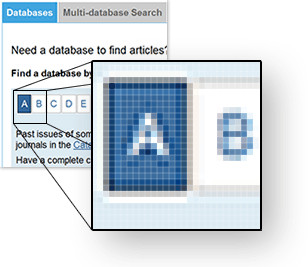 |
| Unscaled snapshot. Edges are sharp. | Scaled snapshot. Anti-aliasing creates more pixel data and results in a larger file size. |
| Tip: If you can't fit everything into a small region of the screen, try reducing the application's zoom level. For example, if you are taking a snapshot of a web browser, press CTRL minus to zoom out. For a Microsoft Office application, use the zoom controls |
Take the snapshot
In Windows, you could use the Windows Snipping Tool ![]() . This will only allow you to save the snapshot as a jpg, gif or png. You could also click the PrtSrn key, or ALT + PrtScn and capture the snapshot on your clipboard; you can then paste it into Photoshop. Mac users should refer to these instructions for capturing a screen shot.
. This will only allow you to save the snapshot as a jpg, gif or png. You could also click the PrtSrn key, or ALT + PrtScn and capture the snapshot on your clipboard; you can then paste it into Photoshop. Mac users should refer to these instructions for capturing a screen shot.
Cropping
Crop your snapshot in PhotoShop or Pixlr to achieve the desired size. If you haven't needed to resize the snapshot, you may achieve a smaller file size by saving it as a gif.
Resizing
If your snapshot is still too large to fit the CourseBuilder page, and you have reduced the window size as much as possible before taking the snapshot, you can resize the image in Photoshop or Pixlr. In this case, you may achieve a smaller file size by saving it as a jpg.
Compressing
We have prepared guidelines for compressing images in Photoshop. The same principles apply to other image editing software.
Using your snapshot with CourseBuilder
Once you have saved your snapshot as either a jpg, gif or png file, insert it into your CourseBuilder page using the Text Block element.
I want my students to access the lecture recordings
After a scheduled lecture recording, you will be sent an email containing the links to view or download the Mediastore videos. If you are using Cecil for your teaching, see a video demonstration on adding lecture recordings in Cecil.
If you want to (also) add the links to CourseBuilder, you can simply copy these links from the email and paste them into a Text block element.
More information on lecture theatre recording.
Some of my images don't display
If you have uploaded an image to CourseBuilder but it does not display, please check the image file name. Certain keywords are blocked by the University's firewall; this is a security measure to prevent phishing attacks.
Known keywords include redirect and advert, e.g. if your image file name is symposium-advert.jpg, it will be blocked. Please rename the image file and upload it again.
Make media file downloadable by students
Two ways
1. Put instruction to let students know they could mouse right click on an audio link, in the popup context window, choose to 'save link as' to save the audio file.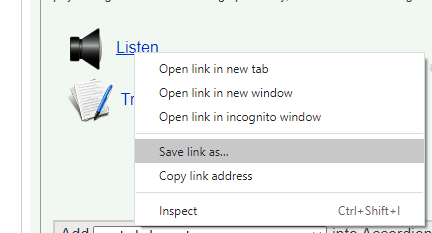
2. Switch to 'Plain' html code view, put 'download' in that link tag. See example below.![]()
 Student engagement and feedback
Tell me what student engagement and feedback options are available
There are several ways to enable student engagement:
Create a web form using Feedback/survey/practice quiz. Students' responses are stored on the server and course administrators can review them (or download to Excel) from CourseBuilder. Administrators may also receive responses by email (not recommended for large classes). If the course website is behind Unisign, the student's username can be added to the response so you can verify who sent it. Please email coursebuilder@auckland.ac.nz if you'd like to use this feature.
- Student journal/note enables students to add study notes or journal entries to the course website. These notes are identifiable by the student's UPI and can be viewed by course administrators. If you require students to submit their work, the Student journal/note summary allows students to create a PDF or Word document of their notes which they can upload to Cecil Drop Box for marking.
Students can leave a comment on a page that is visible to everyone, or they can respond to someone else's comment. Course administrators have the option to delete comments (using CourseBuilder) if they are considered inappropriate. Students can choose to remain anonymous so if student engagement is part of their assessment, they should be encouraged to identify themselves.
The chat feature enables students to text chat with others when they are online. Enable this via the Course preferences -> Advanced tab. The chat feature has been disabled due to connection requests overloading University network infrastructure. If your CourseBuilder course materials are embedded within Canvas, please use Canvas' Chat feature instead.
- With the Voice recorder, students use their headset to record their speech. Recordings are saved to the CourseBuilder server. Students can record voice notes for study, language practice and assessment. Students can choose whether the recording is:
- private – only the student and the course administrator can access it, or
- public – all students can listen to it.
Course administrators can set a submission deadline, preventing students from making new recordings after the date/time. This is useful for language courses where recordings are assessed.
- Course administrators can allow students or groups to edit nominated course pages. This is useful for individual or group assignments. See Student authors for more detail.
I want to download data from my questionaire
If you have used the Feedback/survey/practice quiz element to add a survey or questionnaire, the data submitted by students is stored on the CourseBuilder server. CourseBuilder administrators can click the View submissions link to open a page showing a list of individual submissions received. From there you can click Download to Excel which allows you to either open the file within Excel, or save it to your desktop.
How to undo a highlight?
Double click on highlighted text.
 Saving and backing up your work
My changes are not being saved
Web browsers use 'page caching', a technique that stores visited web pages on your local computer. When you revisit the page, instead of downloading it again, the browser displays the local version. Your changes may be saved, but you can't see them.
Page caching is designed to minimise download time and Internet bandwidth, unfortunately it can also cause headaches for web content developers. Page caching and Content Management Systems (CMS), like CourseBuilder, do not play well together.
Disable page caching in Internet Explorer:
- Click Tools.
- Choose Internet Options.
- Under Browsing history click Settings.
- Under 'Check for newer versions of stored pages' choose Every time I visit the webpage.
- Click OK.
- Click OK.
Disable page caching in Firefox:
- In the browser address bar type about:config.
- Accept the warning message.
- In the 'Filter' type browser.cache.check_doc_frequency.
- Double click the entry that appears.
- Change its value to 1.
- Click OK.
- Close the tab/window.
Disable page caching in Safari:
- Click Developer.
- Choose Disable Caches.
I accidentally deleted a page or content within a page
Often pages and page content can be restored.
For page content, click the Page history link in the page footer; this will display a list of page versions. Choose the version of the page to roll back to.
For restoring deleted pages, please email coursebuilder@auckland.ac.nz and request the reinstatement. Please include your phone number and the CourseID number in your email. If it's urgent, phone Wen-Chen Hol on 84984.
I want to back up my course
CLeaR backs up all CourseBuilder websites every night. In addition, individual pages are automatically backed up before you edit page content.
You can also download the entire published course (Student View) as one zip file. See Generate zip file while publishing.
I want to make changes to my course but keep a copy of the original
You should clone the original course and rename both versions accordingly (e.g. 2013 version, 2014 version). Then make sure that you give out the URL for the new published site to this year's cohort, and update the link in Canvas (if appropriate).
I want to download a copy of my course before I edit it
- Activate the Generate a zip file while publishing feature from Course preferences -> advanced tab.
- Publish the course

- Return to the CourseBuilder site list

- Click the download icon
 to begin downloading your course.
Note: To save space on the CourseBuilder server, zip files will be deleted from the server overnight. You can generate the zip file again by republishing your course.
I downloaded my course as a zip file but I cannot open it
You can download your course and save it to your local computer from CourseBuilder's site list ![]() . The course will download as a compressed archive file (zip file). Before you can view the course locally, or burn it to a CD Rom, you will need to extract/unzip the file.
. The course will download as a compressed archive file (zip file). Before you can view the course locally, or burn it to a CD Rom, you will need to extract/unzip the file.
If you have WinZip installed – the University has a site licence – you should open the zip file within WinZip and choose the 'Unzip' option. Otherwise, if you are using Windows you can open the zip file within Windows' Explorer, then select and drag all of the folder contents into a new folder on your desktop.
| Tip: create a new folder on your desktop first, then extract the zip file within the new folder. You can delete the zip file once it has been extracted. |
For more information about enabling the course download feature, see Generate a zip file while publishing.
 General questions
What CourseBuilder support is available?
Please refer to the avenues of support outlined on the CourseBuilder Support home page.
Tell me about copyright
If you are a staff member at the University of Auckland, check the information on copyright on the Staff Intranet.
Tip: If you find you need to clear copyright, start the process as soon as possible. Responding to your request may not be a priority for the copyright holder. Assume nothing! It can be surprising who is 'generous' and who is not. |
Digital repositories
There are lots of digital repositories where you can download and use material.
- Flickr Creative Commons or WikimediaCommons or Photopin - photos with Creative Commons licences.
- freeimages.com or morguefile.com - free photo sites.
- YouTube videos can be embedded relatively easily. You might need to check the link intermittently as you have no control over whether the video will remain there.
- Television and radio broadcasts can be used for educational purposes under the Tertiary Screenrights licence.
Note: Creative Commons licences usually require attribution. Check whether you need to attribute images or videos and whether specific wording is requested.
University Media Productions
University Media Productions provide a full range of professional photographic and television production services in support of teaching, research and public relations. If they do the work for you, the copyright rests with the University of Auckland. They are also used to dealing with privacy issues.
I want to copy content from existing courses/pages
You can copy existing content by cloning the entire course or a single page.
You might clone an entire course to archive courses from previous semesters, or if you have several similar courses for different audiences. See CourseBuilder basics » Create a course
You might clone a page when you want several topics (or weeks) with a similar layout. If a page has sub pages, these will also be cloned. See CourseBuilder basics » Add pages (navigation)
![]() Tip: Cloning courses/pages makes copies of all the associated images and media files. Please clone wisely - unused files still take up space on the server. If you are cloning a course to retain the layout only, i.e. you will delete all the content and start again, perhaps you might consider cloning a course template devoid of content.
Tip: Cloning courses/pages makes copies of all the associated images and media files. Please clone wisely - unused files still take up space on the server. If you are cloning a course to retain the layout only, i.e. you will delete all the content and start again, perhaps you might consider cloning a course template devoid of content.
I want to create a zip file for use with CourseBuilder
A zip file is a collection of files packaged/compressed into a single file. Some CourseBuilder elements require you to upload a zip file, e.g. Embedded web resource or Image stack.
To create a zip file in Windows:
Either use WinZip to create your zip file. The University has a site licence for the WinZip software,
or right-click on the folder that contains the files that you want to zip and choose "Send to > Compressed (zipped) folder".
To create a zip file for Mac:
Richt-click the folder that contains the files you want to zip and choose "Compress items".
The editing windows are too small
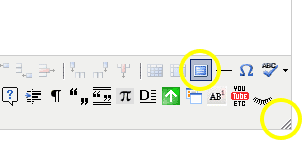
Expand the Richtext editor window, either drag the handle at the lower right corner of the editor panel, or click the Full Screen Mode icon.
I can't get the Viewport to webpage element to display an embedded webpage
The URL that you have pasted into the Viewport to webpage element starts with http://, but the main CourseBuilder website URL starts with https:// (SSL secure), therefore the browser will not display the viewport content. This is a browser security feature to prevent phishing attacks.
Sometimes the website you are trying to embed will also allow https://, e.g. YouTube. Try changing the URL to https:// and see if that fixes the problem. If it doesn't work, you may consider either publishing the CourseBuilder site to a non-secure URL (e.g. http://www.flexiblelearning.auckland.ac.nz/[coursecode]), or, instead of using Viewport to webage, simply create a text link to the webpage.
Another reason why the Viewport to webpage element may not work is that the destination webpage does not allow itself to be displayed within a viewport. JavaScript detects that the page is embedded and it either doesn't display, or it pops out of the viewport.
How long does my course remain active?
The answer is indefinitely. If you would like a course to be deleted, please email coursebuilder@auckland.ac.nz
How to add H5P content in Coursebuilder?
Copy the embed code from H5P element, use widget element to paste the code in. H5P content will then resize automatically within the page.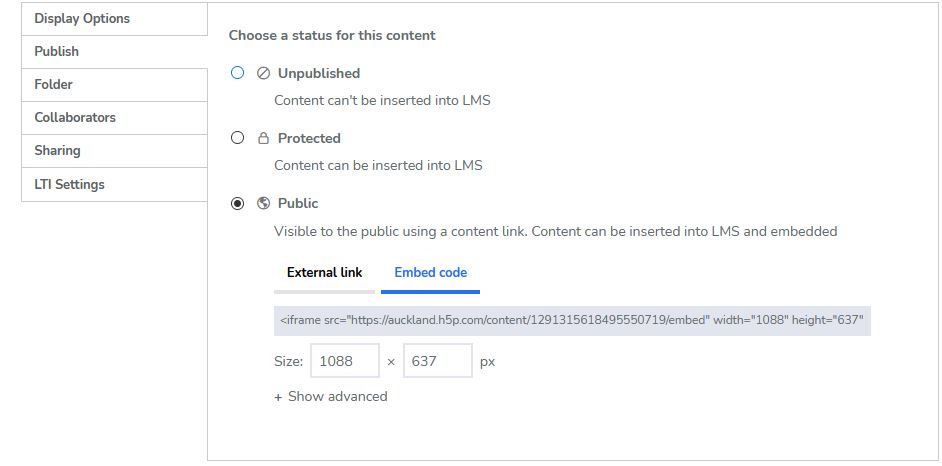
On this page navigation pane
Show page structure by parsing Heading1/2/3(H1,H2,H3) tags in a page, just like wikipedia. Also utilize Interaction Observer to indicate when targets are in viewport.
Click the "On this page" line could toggle the hide/show of the page structure.
It only shows when page viewport is wider then 1439px, to avoid overlaying with current content area.
Show page scructure by parsing Heading1/2/3(H1,H2,H3) tags in a page, just like wikipedia. Also utlisize Interaction Observer to indicate when targets are in viewport.
Click the "On this page" line could toggle the hide/show of the page structure.
It only shows when page viewport is wider then 1439 px, to avoid overlaying with current content area.
How to provide print version of existing pages or embedded element for students ?
For main page: there is a page property that will provide a pdf version of the whole main page and sub-pages.
Also a print version for sub-page.
For embedded conent:
Embedded page: printable when framed within Canvas.
Embedded elements: only Firefox could allow print select frame content. For other browsers, users will have to open frame in other tab to print it.
Questions that are not already answered here can be directed to the CourseBuilder team via the
If you would like learning design advice, either contact your faculty representative or request a consultation with the elearning team at CLeaR; see the Getting Help and Elearning Projects sections on the homepage.
For urgent teaching matters relating to CourseBuilder, please email coursebuilder@auckland.ac.nz


